Showing posts with label windows. Show all posts

Tuesday, October 7, 2014

breaking news

As the friend I've been bitching to about this would say, "people are heathens."

The house next door to me continues to cause grief.  It's a large and very attractive Prairie Foursquare, and today it's been painted white and is having it's original three over one sashes and storms thrown away in favor of blank expressionless vinyl.

Yes flippers, take a historic home sandwiched between two big restored Victorians and paint it white, black and plastic.  Surely this will bring the buyers running....

Friday, September 26, 2014

paint by the foot

These past few days have been beautiful, and it looks like we'll be getting more of the same in the upcoming week.  I've been using the time to wrap up some painting I started much earlier in the summer - the plan had been to be much further along, but sick dogs, a spike in paying work and a troublesome neighbor managed to throw a wrench in those plans.


This part of the house was in wretched condition when we bought it.  A window had been removed, and the hole filled with fiberglass insulation covered with a piece of plywood.  The rotted built-in gutter and leaking downspout were pouring directly into the hole, which made a lovely spongy home for a colony of carpenter ants.  On the interior, this space had been walled off from the rest of the bedroom to form a kitchen of sorts, with a collapsing drop ceiling and a nice 50's steel sink cabinet that had never been installed.

and yes, they removed tile to build that wall...

braving the plywood and temporary tar paper
We have no idea why this window was removed, although I did pull out pieces of broken glass from under the floorboards - our best guess is that it's one of the windows used to fill in the doorway and stained glass window in the original entry from when the house was divided and the entry moved.  We think the other window in the entry came from our office - which has a little wood replacement window.  When we restore the entry we'll move the two windows in there to these two spots - for now I'll count my blessings that I found a used replacement window with the perfect dimensions at the Habitat Restore for $15.  While I'm usually the first to expound on the evils of vinyl, there's a time and a place for everything.


When we installed the window we jerry-rigged a new sill and trim that will be replaced when we re-install the correct window.  Since the restored window will be slightly different dimensions, it didn't make much sense to spend too much time or money on it.  Same goes for the cedar shingles, we replaced what we had to when we put in the window, but the rest are at the end of their lifespan and will get dealt with later.


None of this had been painted, caulked, stained or primed though, so three years later I conned the flying monkey into helping me set up some scaffolding.  Convincing him wasn't too hard being that water was making it's way in through the un-caulked window.  Half a tube of Sika-flex bronze later, this section of the house is water tight (why can't they make a brick color though!).  Many hours of scraping, sanding and filling later and I was able to prime everything, although it wasn't until yesterday that I actually got paint up.  


the flashing had to be re-glued and clamped

primed, stained and caulked
two months for 15 feet of trim...
from the inside, just need to finish plastering
 Hopefully this slow progress isn't how the rest of the painting will go, on the other hand, I bought scaffolding casters, which may have been my best idea ever.

Friday, August 29, 2014

the lottery, luck and helpful ghosts...

I won the lottery folks. Not the kind that will pay for carpenters and fancy woodwork, the better kind. The kind where a few days after firing an e-mail off into the aether I get a few scanned documents back. AND PICTURES! (And let me preface this post by saying please don't pin these images yet - we're not clear on permissions and such, and only have these for research purposes at the moment).

The J.G.Kelly house just after it was built
Courtesy of The Frick Collection

Every few months we do a variety of searches online to see if anything new has appeared, which happens frequently as libraries continue to digitize their collections. Last week we found some promising leads through the Frick Collection, a collection of Henry Clay Frick's correspondence in New York City. Mr. Frick sat on the board of Braddock National Bank, and so we were hopeful that they would be able to provide us with business letters etc... While they had that in spades, what we didn't expect were several stray pictures they had that were simply labeled "Edgewood." The suspense as we downloaded them was excruciating.

Isabella Coleman around 1890, our house, the J.G. Kelly house is in the background
Courtesy of The Frick Collection

Most of them were extraordinary interior photos of our neighbor's home before the turn of the century. Everything from young women in togas (maybe for May Day), to handsome cross dressing men with guns and guitars. My jealously is absolute and knows no bounds. And yes, I'll post them once I get proper permissions.

The wonderful thing about the photos of our house are that since it's likely they were taken by the Colemans, they show what was the back of the house. We can now confirm the placement of the original paint colors (dark red and mustard primarily, with two as yet unknown lighter colors). More importantly, there's no kitchen wing! This resolves so many questions for us, why there's evidence that the basement was finished, why the addition seems so awkward in how it attaches to the house etc... Sharp eyes will notice that instead of a kitchen wing there's what looks like a three sided conservatory coming off the dining room on the left. It looks as though it sports large half-round stained glass windows, with lattice work in the lower sashes. I would consider living on take-out for the rest of my days if someone offered to rebuild it for me.

Courtesy of The Frick Collection

We can also see the reason for the mismatched windows in the guest bedroom and library - it's because they're not original! Actually, they're original, they're just not in their original locations. After the addition was tacked on they took the windows that were blocked and added them to other locations on the house. This also explains why the bedroom is missing it's linen press, and why there are so few built-ins downstairs - they were removed in favor of additional windows.

We're also able to see our front stained glass windows on the stair landing for the first time. Staring at them till my eyes bled revealed that the middle sashes are a branch and leaf design (the pair are inverses of one another), while the lower sashes seem to have a garland design. I have no idea what the transoms could be though. These pictures reveal just how much stained glass has been lost from the house - the only remaining pieces are the third floor windows, which are blessedly intact. Besides those, we're missing at least 11 stained glass windows. The shards of colored glass in our yard can't account for that many windows - the thought that there were likely sold off and are now installed elsewhere brings me to tears...

Courtesy of The Frick Collection

A quick rundown of other changes, there's one dormer instead of two, obviously the porch (although you can see another set of stairs winding under the stair bay which is very interesting), the enormous wrought iron fence on the stone base, the shed over what used to be the basement entrance (again explaining some strange architecture), and the terracotta cresting. The cresting is still visible on the initial antique photo we found, although the corner pieces are gone by that time. We can be fairly certain now that our initial photo dates to around the second time the house was listed for sale around 1915, since it was sporting a considerable number of Colonial Revival "updates," including the cream paint job and paneled porch railings.

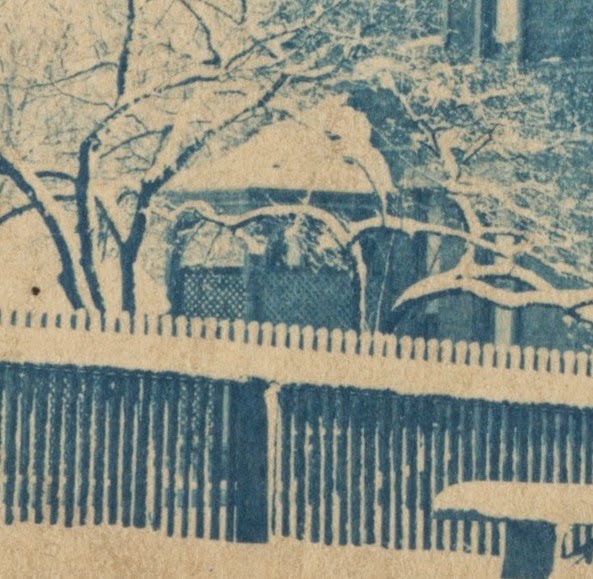
In the distance through the snow, now with the kitchen addition
Courtesy of The Frick Collection

The last thing worth mentioning is the strangest tidbit of all. The day before we found the Frick Collection I had a dream in which Mr. Kelly took me on the tour of the house - I've never had a dream like this before. It was quite clear to me in the dream that this tour was something special (akin to a behind the scenes historic home tour). The only thing I remember quite clearly is Mr. Kelly walking me around the back of the house, and my thinking of how lucky I was. While I don't remember what I saw in my dream, I do remember being absolutely ecstatic about it. A few days later, and these pictures are mine....

Thursday, September 5, 2013

the two towers

In a previous post I made a joke about house value being calculated by the number of gables one has. I was mistaken, it's actually based on the number of towers.


Although work has been going slowly, the guts are all there - the walls, roof and cupola are all just waiting for shingles and siding. While the bell tower will be slated, the rest of the roof will just be asphalt (can't have it all I guess). Luckily, we have enough in store for the tower that I'm fairly certain it'll be all that anyone notices, and if their eyes do wander, the oak carriage house doors will take care of that! Nevermind that the "doors" currently consist of an antique shop drawing, a box of hardware, a mountain of discarded oak flooring and some filthy barn track. I wouldn't be surprised if they're one of those DIY blogger projects that ends up looking far more lovely in photos than in person . . . On the other hand, I'm also convinced that I have superpowers and am invincible - so we'll see how it plays out.

check out those rafter tails!

Our bell has also been doted upon over the past week. It was in such nice shape I had intended only on going over it with a brass brush before painting it, but when the brush gummed up I realized that the bell had been painted in several thick layers of white latex house paint (enough so that I joked the bell was an inch smaller in diameter). I used several coats of chemical stripper (actually heavy duty adhesive remover that I had left over and would never use again now that nearly all of the glue down carpet has been removed from the house) and thankfully revealed no cracks, just a nice beaded detail that had been completely lost under the paint. The writing on the yoke is now easy to read as well, the yoke did get painted out in red, as that did appear to be the original color. The bell was cast in Hillsboro Ohio in 1886 by C.S. Bell, with the scraping and painting it should be maintenance free for the next hundred years (assuming no one steals it again, or lets the building collapse on top of it).


I'm nearly done with the windows, and rather miraculously finished the stained glass window yesterday. The window itself cleaned up surprisingly well given how much damage it had (the muntins were all individually glued and clamped, and the checked wood filled with epoxy wood filler), and I got each piece of glass perfect on the first try - a small miracle when working with textured glass. The glazing itself is rather pathetic, but I know when to pick my battles.

apparently I forgot to take a picture of the actual window,
so my mock up for color and placement will have to do...

Friday, August 30, 2013

window work

As it turns out there are an infinite number of bad puns I can make about panes of glass, none of which are clever enough to inflict upon you. But the restoration and reglazing continues - I'm done with the schoolhouse sashes that were in good enough shape for me to work on myself, and there are four left that need new muntins cut and fit, which I decided was beyond me (i.e. cheaper to let our carpenter fix them than buying the router and bit and learning to do it ourselves). I'm also half done cleaning up the queen anne window which will be getting some stained glass. The paint on it hid a multitude of horrors, so it's been a slow process, although at least no one glazed it with caulk like the school house windows! I took a ton of pictures thinking perhaps I'd write a tutorial, but realistically, I'm not reinventing the wheel here, so let me just refer you to the brilliant one at Old Town Home (http://www.oldtownhome.com/2011
/9/28/Window-to-Your-World---A-Glazing-Tutorial/
). But since I took the pictures anyway . . .


I don't know why I didn't bother to take before pictures, but this is some caulk left in the corner of one of the busted windows. Although I knew not to caulk instead of glaze, I never understood just how bad it was - removing it shredded the wood of the very delicate window, broke the antique glass in a number of windows, took ages, and was just generally awful. Don't do it folks, if it's an emergency fix you're looking for just smooth some glazing in the gap with your finger. Also, don't use finish nails driven all the way through the muntin in the place of the two glazing points you should be using. Just saying . . .


This was my set up for glazing, for glass removal I recommend a regular table as it'll let you put more force into removing the glazing without pushing the sash off the sawhorses. For glazing you want to easily be able to reach underneath the sash to move the glass around, so sawhorses are perfect. And yes, the Sarco dual glaze is an integral part of my set up. Buy some. You need it. The whole sash was sanded, loose joints glued and clamped, and everything but the sides painted with oil based primer. Once the finish coat of paint goes on (after the glazing sets up) I'll wax the sides to protect them and help them slide.


Not bad for 138 years old . . .

windex and a razor blade before you even think
of putting glass back in a window!

Some panes of glass are just suicidal, they will break no matter what you do, so try not to cry (or let them cut you). If you have very stubborn glazing, or a very delicate window you may help your mental health by holding the window (with clean glass) up to the light, and evaluating which of the panes you couldn't bear to break (this only applies in the case of antique glass), focus on getting the wavy, distorted pieces out intact, and don't worry to much if the others don't make it. Here in Pittsburgh antique glass is easy and cheap to get, if this isn't the case where you are call window replacement companies (small family run ones are best) that work in historic areas. A nice phone call (do not berate their chosen profession!) and offer of a bit of cash will get you a phone call next time they're ripping out historic windows, after all, they normally have to pay to trash them, they'd rather give them to you as long as you make it easy for them . . .


In the windows I've disassembled I've noticed that glass that's been bedded in glazing is generally unbroken, with the wood in better shape in the rabbet. So, that's what I do . . .


When I install the glazing points I count them out and put them on the panes before installing them as I mysteriously tend to forget them if I don't.


Carefully flip the window over and remove the glazing that's oozed out, I love my teardrop paint scraper for this, just be careful not to gouge the wood - this doesn't require any force. That scraper blade, along with the chisel side of my glazing tool gets the brunt of the initial glazing removal in the break-down stage as well.


This is what you'll be left with. Remember, this will face inside, so make sure it's pretty.


Flip the window over, apply the glaze and use your glazing tool to make the bevel. Pull the tool towards you slowly and at a hard angle, leaving just enough glaze to cover the rabbet visible from underneath to the top of the frame. I start from the middle of each side and pull straight through to the middle of the next side, being careful to keep the angle through the corner. Although glazing is somewhat a point of pride for DIY'ers, I'm the first to admit I'm not that great at it - what's important to remember is to keep a sharp angle, and make sure the putty is bonded and smooth to the wood and the glass. Remember, this is meant to be functional, not an art form!


And look, this sash is half done. Why half you ask? Because this was the last of the original glass that could be saved . . . More to come . . .

Monday, August 19, 2013

house of seven gables no more

It's official, we have a gable! This brings our gable count up to 8. More is better right? I'm sure that's how they calculate property values . . .


It's been slow and steady progress on the school house/carriage house project, but why would I argue with a carpenter who has taken it upon himself to hand notch all the oak supports?


The building still had a bit of a sway after the beams went in, so in an effort to prevent another 20 degree lean 138 years from now we bit the bullet and notched in diagonal cross-bracing, something that was conspicuously missing in the original construction. Now shored up, we should have a roof this week, and our giant pergola will be gone for good (mind you it was supposed to be at the pergola stage so we could eat under it during our family reunion)!

the "pergola"
there seems to be an errant dog toy stranded up there . . .
threshold poured for the door

The threshold, it's sad to think that Wirsing School Road
is missing its school . . .

The windows are progressing, with four sashes done, two intact ones to finish, and four to repair, along with 36 panes of glass left to cut (not including the queen anne window in the gable). I tracked down a bunch of glass over the weekend, including 4 pieces of spectacular old glass (1870's) from a house that's being parted out and demolished (sadly they wanted a fortune for everything I was interested in). Pulling the glass out of the condemned windows is a process in itself, but I should have enough to work with now... At least I don't have to work alone...